'C++ builder'에 해당되는 글 12건

  1. 2019.09.04 [ilink64 Error] Error: Unresolved external '_lseek' referenced from C:\PROGRAM FILES (X86)\EMBARCADERO\STUDIO\20.0\LIB\WIN64\RELEASE\RTL.A|System.ZLib.o
  2. 2017.02.20 ilink32 Unable to perform link
  3. 2015.10.16 E2209 Unable to open include file 'UnitGr32Pas.hpp'
  4. 2015.10.02 [Error] Control 'GLSceneViewer1' has no parent window.
  5. 2015.09.15 C++ Builder에서 GLScene 사용하기 #2 - 마우스 이용하기
  6. 2015.09.15 C++ Builder에서 GLScene 사용하기 #1
  7. 2015.08.19 [ilink32 Error] Fatal: Unable to open file 'UNITGR32PAS.OBJ'
  8. 2015.06.18 BC++ Enable Debugging
  9. 2015.05.22 Indy Send Unicode 문제
  10. 2015.05.14 ExtractStrings의 버그를 SeparateStrings 으로 해결

win64 link 할때 _lseek 에러 발생

https://community.idera.com/developer-tools/programming-languages/f/c-rtl/37828/unresolved-external-_lseek


Unresolved external '_lseek' - C++ RTL - Programming Languages - IDERA Community


community.idera.com

여기 들어가보면

#if defined(_WIN64)
    extern "C" long  lseek(int, long, int);
    extern "C" long _lseek(int fd, long offset, int origin) {
      return lseek(fd, offset, origin);
    }
#endif

hotfix 추가했다는데, 최신본 구독안하는 독자들은 그냥 버리는구만.

뻔한 버그 수정도 안해주는 회사!!!

[ilink32 Warning] Warning: D:/NextigeApp/OpenCVTest32/UsingOpenCV32.ilc: 0x00010000 / 0x08000000

[ilink32 Warning] Warning: D:/NextigeApp/OpenCVTest32/UsingOpenCV32.ild: 0x00010000 / 0x08000000

[ilink32 Warning] Warning: D:/NextigeApp/OpenCVTest32/UsingOpenCV32.ilf: 0x00010000 / 0x0a000000

[ilink32 Warning] Warning: D:/NextigeApp/OpenCVTest32/UsingOpenCV32.ils: 0x0003b000 / 0x08000000

[ilink32 Warning] Warning: unknown heap name   : 0x08000000 / 0x08000000

[ilink32 Warning] Warning: Error detected (LME288)

[ilink32 Error] Error: Unable to perform link


--------------------

며칠전 발생 : PC 리부팅 후 그냥 제대로 동작.

2017-02-20 오늘 다시 발생. BC 재시작해도 마찬가지.

리부팅 나중에 해보고나서 다시 기록할 거임.

--------------------

http://stackoverflow.com/questions/28929516/c-builder-xe7-lme288-error

(1) ilink32.exe /LargeAddressAware

   1) Patch

      lamarker -M -Filink32.exe

editbin /LARGEADDRESSAWARE bcc32.exe

editbin /LARGEADDRESSAWARE ilink32.exe

  (2) bcdedit

  1. Run command prompt as Administrator.
  2. Type (without quotes) "bcdedit /set IncreaseUserVa 3072"
  3. Reboot computer.

  (3) bcdedit

  (4) Acronis true image : 작업관리자 창에서 삭제

  (5) Admin계정으로 BC 시작

  (6) ...


As Drewski I ran into the LME288 error after the upgrade to Windows 10 (x64).

The error disappeared changing the Data Execution Prevention settings for ilink32.exe:

  • System properties -> Advanced system settings -> Performance -> Settings -> Data Execution Prevention
  • Turn on DEP for all programs and services except those I select -> ilink32.exe.


  (7) PATH 변수가 2047 넘어서?

상황 :

C++ Builder 프로젝트에 UnitGr32Pas.pas 라는 소스 추가

UnitGr32Pas.hpp 가 없다고 E2209 컴파일 에러


원래 UseOpenCV30 프로젝트가 있는데,

UseOpenCV31 로 SaveAs...로 프로젝트 이름 바꾸기 한 것


UnitGr32Pas.pas를 프로젝트에서 지웠다가 다시 추가해도 마찬가지 현상.

왜 .hpp 파일을 만들지 않지?


해결 :

2015-10-16 현재 아직...

2016-02-15 현재 아직...


Control 'GLSceneViewer1' has no parent window.


GLScene Editor 가 열리지 않을 경우


--- Solution ---

참조 : http://glscene.sourceforge.net/wikka/GlsceneFaq#q_misc_011

clipboard에 GLSceneViewer 가 남아 있을 경우.

그래서 Clipboard를 비우든지,

아니면 아무거나 Ctrl-C 해서 Clipboard를 다른 내용으로 바꾸든지 하면 OK.

앞의 #1 - 설치 이후 계속


(1) Scene 설정

Scene에 아래와 같이 수정/추가 한다.

FreeForm과 Actor의 차이를 모르니까, 일단 둘 다 추가


FreeForm/Actor를 움직이게 되면, Camera가 따라 회전한다.

Camer의 시점을 고정하기 위해서, DummyCube를 추가한 다음에,

GLCamera의 Target Object = DummyCube로 해 둔다.

이러게 해 두면, FreeForm/Actor 를 움직여도 실제 움직이는 효과가 나타난다.


(2) PLY 파일 불러오기

const String fName = "c://DelpApp//Components//FreeComp//GLScene//Samples//media//Polyhedron.ply";

GLActor1->LoadFromFile( fName );

         또는

GLFreeForm1->LoadFromFile( fName );


그 다음에, GLScene Utils에 있는,

TGLSimpleNavigation 추가한다.

컴파일 -> 실행하면 이상없이 OK


#2 끝


(1) 설치

구글에서 GLSecne 찾는다.

홈페이지는 여기

Source File : here

다운 받아서 설치

c:/DelpApp/Components/FreeComp/GLScene

여기에 압축해제했고,

GLSCENE_INC = ..../Source/Include

GLSCENE_LIB = ..../Source/lib

환경변수까지 입력하면 설치 완료

아래 예제는 .../Help/GLSceneTraining.chm 참조해서 작성


(2) 첫 예제

1) VCL app 하나 만들고, 

TGLScene

TGLSceneViewer

하나씩 배치

크기는 대충 위와 같이 하면 된다.


GLScene을 눌러 Scene Editor 호출한다


Cube 를 추가


카메라도 하나 추가


Cube, Camera 추가한 직후의 Scene Editor


Camera 를 선택한 다음에,


Camera 의 Target Object를 GLCube로...

그래야 Cube가 보인다


Camera의 위치 변경을 위해서, Position 선택해서,


XYZ (1,1,1) 의 값을 입력한다


자, 이제 Cube가 보인다....


조명을 추가한 다음에,


조명의 위치를 XYZ(1,3,2)로 설정하면,


이제 Cube가 제대로 보인다.


#1 끝


UsingOpenCV30 컴파일 시키면 나오는 에러 "

[ilink32 Error] Fatal: Unable to open file 'UNITGR32PAS.OBJ'

NextColor64 컴에서는 안나오느데, HP에서는 나온다.


- Project -> Option -> Library Path 추가해도 안된다.


2015-08-19일 현재 

아직 원인 불명.

원인 찾게되면, 잊어버리지 않게끔 여기에 기록해 둘 예정.


2017-01-16

원인 찾았다.

GLBaseClasses.obj 계속 찾는데,

path 추가로 해결될 문제가 아니었네.


Delphi 컴포넌트를 C++에서는 Lib 파일로 가져다 사용

프로젝트 파일 cbproj 직접 수정해야.

<AllPackageLibs>

<LinkPackageStatics>

GLScene_RunTime.lib 추가하니까 깔끔하게 해결.


BC++ Enable Debugging

할거리/BC 2015. 6. 18. 16:43

Ref : http://support.smartbear.com/viewarticle/54602/


This topic explains how to prepare 64-bit applications created with Embarcadero C++Builder XE3 - XE5 for AQtime.

To learn how to prepare 32-bit applications created with C++Builder, see Compiler Settings for Embarcadero C++Builder XE3 - XE5 (32-bit). To learn how to prepare applications created with other C++Builder versions, see Compiler Settings for Native Applications.

Note:64-bit applications created with Embarcadero RAD Studio XE3 - XE5 are not currently supported by the Allocation profiler.

To prepare a 64-bit Embarcadero C++Builder application for AQtime, first of all, you need to make sure that it includes debug information. Follow these steps:

  1. Open your project in C++Builder XE3, XE4 or XE5.

  2. Choose Project | Options from the main menu to open the Project Options dialog.

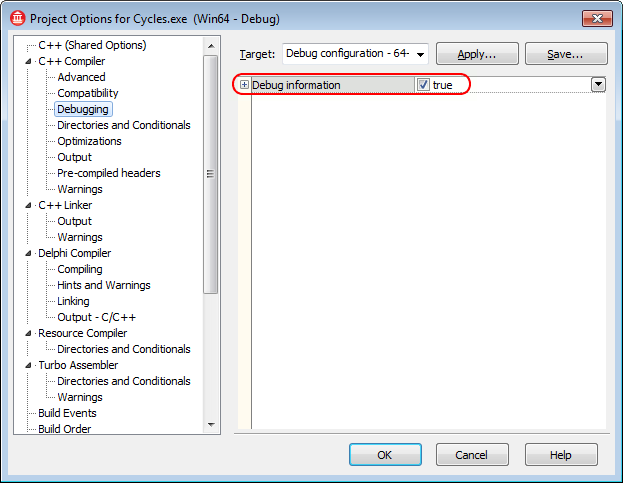
  3. In the tree on the left of the dialog, select the C++ Compiler | Debugging category. To include symbolic debug information, set the Debug information option to True.

    Project Options: C++ Compiler | Debugging
    Click the image to enlarge it.
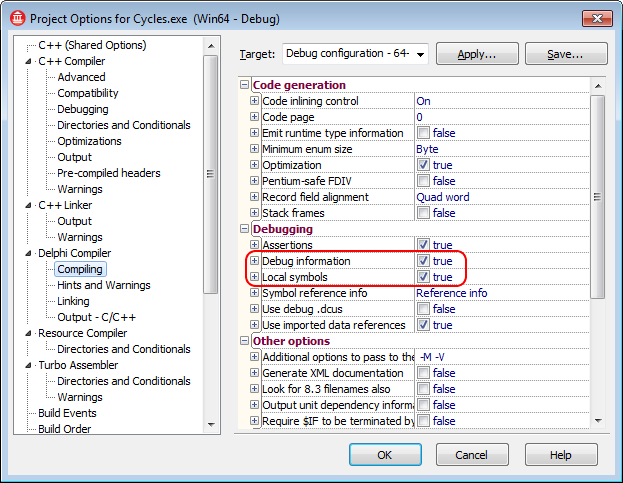
  4. To set the Delphi compiler options, select the Delphi Compiler | Compiling category from the tree view on the left of the dialog:

    • To include symbolic debug information, set the Debug information option to True. In addition, to refer this information to source line numbers, set the Local symbols option to True.

      Project Options: Delphi Compiler |Compiling
      Click the image to enlarge it.
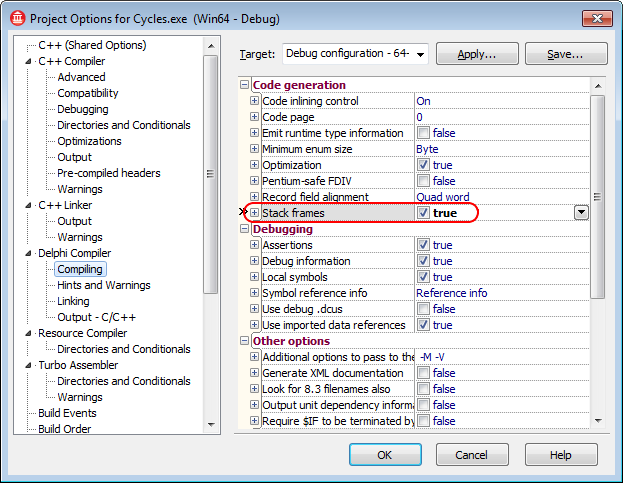
    • (Optional) To generate stack frames when using the Delphi compiler, set the Stack frames option to True.

      Project Options: Delphi Compiler | Compiling
      Click the image to enlarge it.
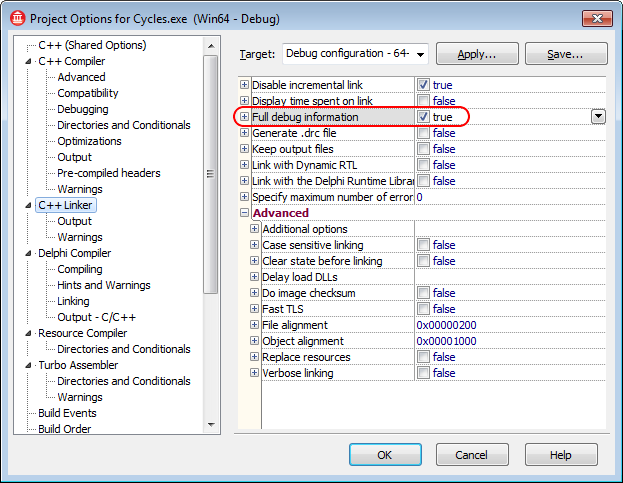
  5. Switch to the C++ Linker category and set the Full debug information option to True.

    Project Options: C++ Linker
    Click the image to enlarge it.
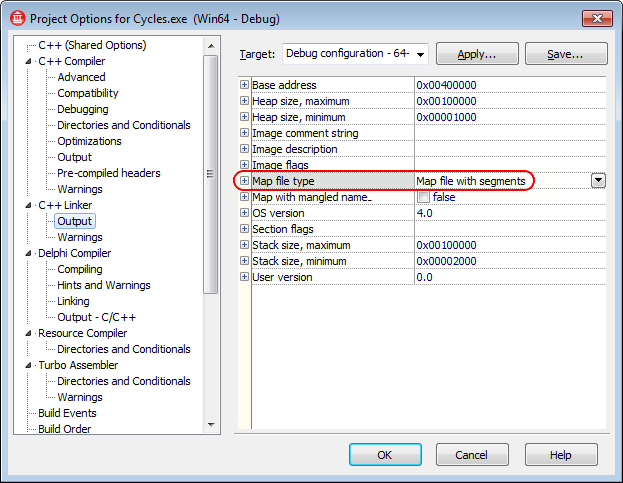
  6. To generate a map file that contains information on the application’s global symbols, source files and source line numbers, switch to the C++ Linker | Output category and set theMap file type option to Map file with segmentsMap file with publics or Detailed segment map.

    Project Options: Directories and Conditionals
    Click the image to enlarge it.
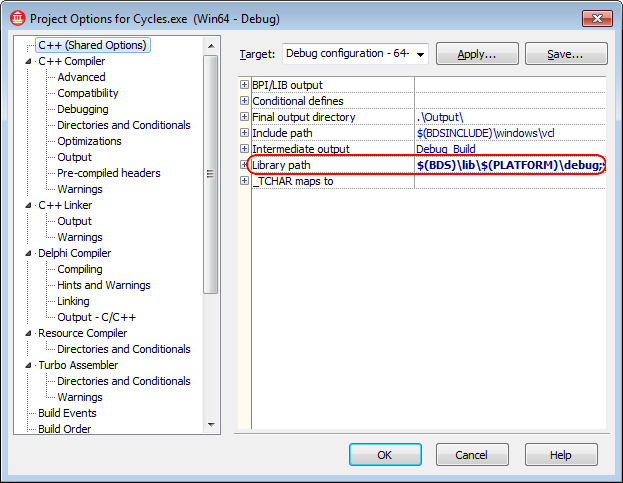
  7. Switch to the C++ (Shared Options) category and check the Library path option. Make sure that the path contains the $(BDS)\lib\$(PLATFORM)\debug folder:

    Project Options: Directories and Conditionals
    Click the image to enlarge it.
  8. Once you have set the compiler and linker options correctly, rebuild your application and it will be ready for profiling. If you are profiling an ActiveX control or a COM server, you need to register its “debug” version in the system (See Profiling COM Applications).

When your application is ready for release, remember to recompile it without debug information to reduce the application size.

Note:AQtime is incompatible with some third-party tools that modify the binary code of your application (for example, those that add a custom exception handling mechanism). An example of such a tool is EurekaLog. We recommend that you profile your application before processing it with such tools.

Nevertheless, AQtime is compatible with AQtrace and supports profiling of applications that use AQtrace for error reporting.

See also
Compiler Settings for Native Applications


Embarcadero 2009 또는 XE 부터 Unicode 가 도입되면서

기존의  component 들 모두 Unicode 문제에 봉착.


Indy 에서 send / receive 할 때, 한글이 포함되면 ?

당연히 깨진다.


해결방법은 ?


보낼 때 : 

UnnicodeString strSend;

IdUDPClient1->Send(strSend, IndyTextEncoding_UTF8());


받을 때 :

void __fastcall TfrmUDP::IdUDPServer1UDPRead(TIdUDPListenerThread *AThread, TBytes AData, TIdSocketHandle *ABinding)

이 함수에다,

Unicodestring BData = BytesToString(AData, IndyTextEncoding_UTF8());


이렇게 처리해주면 된다.

참조 : 

http://www.borlandtalk.com/extractstrings-question-vt90577.html


TStrings 사용하려면 -> #include <Classes.hpp>


int __fastcall SeparateStrings(const AnsiString &AString, char ADelimiter, TStrings *AStrings)

  int Result = 0; 


  if( (AString.Length() > 0) && (AStrings) ) { 

    AStrings->BeginUpdate(); 

    try 

    { 

      char *ptr = const_cast<AnsiString&>(AString).c_str(); 

      char *end = (ptr + AString.Length()); 


      while( (*ptr <= ' ') && (ptr < end) ) 

      ++ptr; 


      char *start = ptr; 

      bool InQuote = false; 


      while( ptr < end ) 

      { 

        if( (*ptr == ADelimiter) && (!InQuote) ) 

        { 

          AStrings->Add(AnsiString(start, ptr-start)); 

          ++Result; 

          start = ++ptr; 

        } 

        else if( *ptr == '"' ) 

        { 

          InQuote = !InQuote; 

          ++ptr; 

        } 

        else 

          ++ptr; 

      } 


      if( start < end ) 

      { 

        AStrings->Add(AnsiString(start, end-start)); 

        ++Result; 

      } 

    } 

    __finally { 

      AStrings->EndUpdate(); 

    } 

  } 


  return Result; 


1 2 

글 보관함

카운터

Total : / Today : / Yesterday :
get rsstistory!